Author

Tin-tin

Browsing

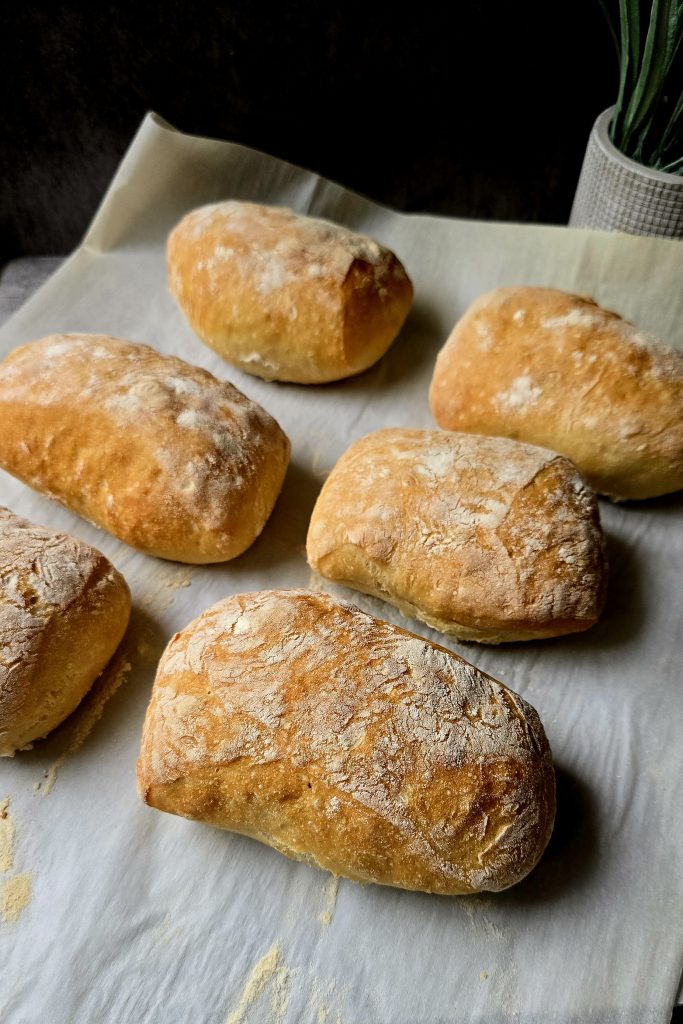
I’ve been wanting to try more European breads lately, and ciabatta was high on my list. It always looked like something that needed special equipment or years of experience but it turns out, it’s actually really simple.

I mixed the poolish the night before around 7 pm, left it out overnight, and by 11 am the next day I was ready to add the rest of the ingredients and start baking. From there, everything came together so easily. The dough was soft and airy, the crust turned out golden and crisp, and the whole process felt surprisingly beginner-friendly. I used a regular baking pan and added another pan with water on the bottom rack for steam no fancy setup needed.


🧾 Ingredients

Poolish (make the night before)

  • 150g bread flour
  • 150g water
  • 1/8 tsp instant yeast

Main Dough

  • All of the poolish
  • 250g bread flour
  • 150g lukewarm water
  • 1 tsp salt
  • 1/2 tsp instant yeast
  • Optional: 1 tbsp olive oil (for a slightly softer crust)

🔧 Equipment

  • Large mixing bowl
  • Spatula or wooden spoon
  • Kitchen scale (strongly recommended)
  • Baking pan
  • Second oven-safe pan (for steam)
  • Parchment paper
  • Clean towel or plastic wrap

👩‍🍳 Step-by-Step Instructions

1. Make the Poolish (Night Before)

In a medium bowl, mix:

  • 150g bread flour
  • 150g water
  • 1/8 tsp instant yeast

Stir until well combined. Cover loosely and leave at room temperature overnight (14–16 hours). It should be bubbly and slightly domed by morning.


2. Make the Dough (Next Morning)

In a large bowl, combine:

  • All of the poolish
  • 250g bread flour
  • 150g lukewarm water
  • 1 tsp salt
  • 1/2 tsp instant yeast
  • Optional: 1 tbsp olive oil

Mix until a wet, sticky dough forms. Don’t add more flour — the dough should be loose.


3. First Rise (Bulk Fermentation)

Cover and let the dough rise for 1 hour. Then do a set of stretch and folds:

  • Wet your hands
  • Stretch one side of the dough up and fold it over
  • Repeat on all four sides

Let it rest 30 minutes, then repeat the folds. After about 2 hours total, the dough should be puffy and jiggly.


4. Shape the Dough

  • Heavily flour your work surface
  • Gently turn the dough out and dust the top with flour
  • Use a bench scraper to divide into 2 loaves, or keep it whole

Handle the dough gently to preserve air bubbles. Transfer to a parchment-lined pan, cover loosely, and let rest for 30–45 minutes.


5. Preheat & Bake

  • Preheat oven to 450°F (230°C)
  • Place an empty oven-safe pan on the bottom rack (for steam)

Just before baking, pour hot water into the steam pan. Bake the bread for 20–25 minutes, until golden and crisp. The bottom should sound hollow when tapped.

Transfer to a wire rack and cool completely before slicing.

🧪 Updated Nutrition (Per Roll — 8 Rolls Total)

  • Calories: 198 kcal
  • Protein: 5.1g
  • Fat: 2.3g
  • Carbohydrates: 38g

💡 Tips & Notes

  • Always use a kitchen scale for accuracy
  • Steam is key for a light, open crumb and crispy crust
  • Avoid overworking the dough — less handling = better texture
  • Slice and freeze extras; toast straight from frozen

The Easiest Ciabatta Bread I’ve Ever Made (With Poolish)

Recipe by Tin-tin
Servings

8

servings
Calories

198

kcal

A rustic, bakery-style bread that’s crisp on the outside, soft and airy on the inside — and surprisingly simple to make at home.

Ingredients

  • Poolish (prepare the night before)

  • 150g bread flour

  • 150g water

  • 1/8 tsp instant yeast

  • Main Dough

  • All of the poolish

  • 250g bread flour

  • 150g lukewarm water

  • 1 tsp salt

  • 1/2 tsp instant yeast

  • Optional: 1 tbsp olive oil (for a softer crust)

Directions

  • Make the Poolish (Night Before): In a medium bowl, stir together the flour, water, and yeast. Cover loosely and let sit at room temperature overnight (14–16 hours). it should be bubbly and airy in the morning.
  • Make the Dough (Next Morning): In a large bowl, combine the poolish with remaining flour, water, salt, yeast, and olive oil if using.Mix until a wet, sticky dough forms. Don’t add extra flour — it should be loose.
  • First Rise (Bulk Fermentation): Cover and let rise for 1 hour.Do a set of stretch and folds (pull one side up, fold over, repeat on all four sides). Let rest 30 minutes and repeat. After 2 hours, dough should be puffed and jiggly.
  • Shape the Dough: Generously flour your surface and turn out the dough gently. Dust the top, divide into 2 loaves or 8 rolls using a bench scraper. Transfer to a parchment-lined pan. Cover and rest 30–45 minutes.
  • Bake: Preheat oven to 450°F (230°C) with a second pan on the bottom rack. Just before baking, pour hot water into the bottom pan to create steam. Bake for 20–25 minutes until golden brown and sounds hollow when tapped.
  • Cool completely before slicing.

Notes

  • Always use a kitchen scale ciabatta is sensitive to ratios.
  • Steam is key for that signature crust.
  • Don’t knead like sandwich bread — less handling = more air.
  • Slice and freeze leftovers. Toast straight from frozen and it still tastes fresh.

🧠 Final Thoughts

Ciabatta always felt like one of those breads that was too fancy to make at home — but this recipe changed my mind. Once the poolish is ready, the rest is simple and hands-on in the best way.

The dough is forgiving, the method is low-stress, and the payoff is huge. A golden, crackly crust with that soft, airy middle and the kind of bread that actually makes you feel proud when you slice into it.

It’s become one of those bakes I come back to again and again, especially on days when I want something homemade that feels just a little extra special.

A beginner friendly loaf with flavor, nostalgia, and a crust that sings when it cools.

I wanted to make something special for my mother-in-law something that reminded her of the bread she grew up with. She told me stories about the warm, chewy loaves from her childhood, baked fresh each day with no shortcuts. I didn’t grow up baking, and to be honest, sourdough kind of scared me. It sounded like a secret world full of unfamiliar steps and perfect timing.

But once I had a healthy starter, I realized the truth: sourdough doesn’t need to be fancy. You don’t need a mixer, a baking stone, or even to knead the dough. All you need is patience, a little trust in the process, and a cast iron pot.

This loaf turned out beautifully rustic with a chewy, open crumb, and a deep, golden crust. And it turns out it was easier than I thought.


What You’ll Need

Ingredients

  • 100g active sourdough starter (should float in water)
  • 375g lukewarm water
  • 500g bread flour (or 450g bread flour + 50g whole wheat)
  • 10g sea salt

Equipment

  • Cast iron Dutch oven with lid
  • Large mixing bowl
  • Parchment paper
  • Kitchen scale (optional but helpful)
  • Clean towel or plastic wrap
  • Sharp knife or bread lame

Let’s Bake: Step-by-Step

1. Mix the Dough

In a large bowl:

  • Stir 100g starter into 375g lukewarm water until mostly dissolved
  • Add 500g flour and mix until there are no dry bits. It will look rough — that’s perfect
  • Cover and rest for 30 minutes (this is the autolyse stage)

2. Add Salt

Sprinkle 10g salt over the dough.
With wet hands, gently squeeze and fold the dough for 1–2 minutes. No need to knead — just work it until it becomes one smooth mass.

3. Stretch and Folds (4 Rounds)

Over the next 2 hours:

  • Every 30 minutes, stretch one side of the dough and fold it over
  • Rotate the bowl and repeat 4 times per round
  • This replaces kneading and builds strength

4. Bulk Fermentation (2.5 to 4 Hours)

Let the dough rest, covered, at room temperature.
You’re aiming for:

  • A 50–75% rise
  • Smooth, slightly puffed surface
  • A gentle jiggle when you nudge the bowl

Warmer kitchens rise faster. Cold ones take their time.


Shaping and Proofing

5. Pre-Shape

Turn dough onto a floured surface.
Shape gently into a loose ball using your hands or a bench scraper.
Rest uncovered for 20 minutes.

6. Final Shape

Form into a tight round or oval based on your pot.
Place seam-side up into a floured proofing basket, bowl, or towel-lined colander.
Cover loosely.

7. Final Proof

Choose one:

  • Room temp: Proof for 1.5 to 2 hours
  • Fridge (recommended): Cover and chill overnight (8–12 hours) for a better crust and flavor

Time to Bake

8. Preheat Your Oven

Place your cast iron pot with lid inside.
Preheat to 475°F (245°C) for at least 30 minutes.

9. Score and Bake

  • Flip dough onto parchment
  • Score the top with a sharp blade (a deep slash down the middle works well)
  • Remove hot pot, carefully lower in the dough using parchment as a sling

Bake:

  • 20 minutes covered
  • 20–35 minutes uncovered, or until crust is deep golden brown

10. Cool (This Part Is Hard)

Let your bread cool on a wire rack for at least 1 hour.
It’s tempting to slice early, but the crumb needs time to set. Trust me, it’s worth it.


Tips That Helped Me

These tips saved me from a lot of stress and weird-looking loaves. Hope they help you too:

  • Sticky dough? Wet your hands. Don’t add extra flour unless absolutely necessary. Stickiness is normal and gets easier to handle as you fold.
  • Use a clear jar with a rubber band to track how much your starter rises. A floating starter is a ready starter.
  • If your dough isn’t rising much, check the room temp. Ideal sourdough temps are between 70°F and 78°F. Cooler rooms can slow fermentation a lot.
  • Want extra crust crunch? Remove the Dutch oven lid during the last 5 minutes and crack open the oven door slightly.
  • Don’t skip the full hour of cooling. Cutting into hot bread makes the inside gummy and ruins all your work.
  • No proofing basket? Use a colander or bowl lined with a floured towel. Rice flour works great to prevent sticking.
  • Parchment makes transfers easy. Slide your dough in and out of the pot without drama or dough disasters.
  • Forgot a stretch and fold? No big deal. Just do the next one and carry on. It’s not that serious — the dough is forgiving.
  • Flour your hands and surface lightly during shaping. Use just enough to keep it manageable without over-drying the dough.
  • Scoring matters. A clean, confident slash helps the bread expand in the oven. Dull knives will just drag the dough.
  • Freeze your leftovers sliced. That way, you can toast one slice at a time and it still tastes like fresh-baked.
  • To refresh day-old crust, splash the loaf with water and reheat it at 400°F for 5–10 minutes.
  • Not sure if it’s under or overproofed? Take notes. It’s part of learning. You’ll be amazed how quickly your instincts sharpen.

Sourdough Bread in a Cast Iron Pot (No Kneading Needed)

Recipe by Tin-tin
Servings

12

servings
Calories

140

kcal

A reliable, beginner-friendly sourdough recipe that balances flexibility with structure. No complicated tools, just a cast iron pot, a healthy starter, and some patience.

Ingredients

  • 100g active sourdough starter (should float in water)

  • 375g lukewarm water

  • 500g bread flour (or 450g bread flour + 50g whole wheat)

  • 10g sea salt

Directions

  • Stir the starter into the water until mostly dissolved.
  • Add flour and mix until there are no dry spots.
  • Cover and let rest 30 minutes (autolyse).
  • Sprinkle salt on top.
  • With wet hands, gently fold and squeeze the dough until it comes together.
  • Every 30 minutes over 2 hours, perform 4 gentle stretch-and-folds.
  • This replaces kneading and builds dough strength.
  • Let dough rest, covered, for 2.5 to 4 hours at room temp.
  • Look for a 50–75% rise and a jiggly, slightly puffed surface.
  • Turn dough onto a floured surface.
  • Gently shape into a loose ball. Let rest 20 minutes.
  • Shape into a tight ball or oval depending on your baking vessel.
  • Place seam-side up in a floured proofing basket or bowl. Cover loosely.
  • Room temp: 1.5 to 2 hours OR refrigerate overnight (8–12 hours) for better crust and flavor
  • Preheat oven and covered Dutch oven to 475°F (245°C) for 30 minutes.
  • Flip dough onto parchment, score with a blade, and bake:
  • 20 minutes covered
  • 20–35 minutes uncovered, until deep golden brown
  • Let cool on a wire rack for at least 1 hour before slicing. Don’t skip this.

Notes

  • Sticky dough is normal. Use wet hands instead of more flour.
  • Overnight proofing gives deeper flavor and a crunchier crust.
  • Use parchment paper to make transferring dough into the pot easier
  • Don’t skip the full cooling time — slicing too early makes it gummy
  • Leftovers? Slice and freeze. Reheat in the toaster and it still tastes fresh.

Final Thoughts

This bread isn’t just food it’s a little piece of memory. For my mother-in-law, it brought back childhood comfort. For me, it was proof that I could make something from scratch that felt like home.

If you’ve been nervous to try sourdough, trust me once your starter is ready, the rest is way simpler than it looks. You don’t need to knead. You don’t need to be perfect. Just mix, fold, wait, and bake.

And when that crust crackles fresh out of the pot? You’ll be hooked.

Some days just feel heavier than others. The kind where you’re pulled in every direction, the to-do list keeps growing, and by evening, you just need something that feels like a small win.

That was me today. And instead of scrolling takeout menus or dragging everyone out for a sugar fix, I opened the pantry, tied my hair up, and made cinnamon rolls from scratch.

I wasn’t going for Pinterest-perfect. I just wanted something warm, something that made the house smell good, and maybe gave everyone a reason to smile. It worked. The kids came running the second the rolls hit the oven, and by the time they were frosted, the tray had already been raided. I made 16 only six were left by the end of the night.

Even better? I got the kind of “thank you” that doesn’t come with words just quiet moments, sticky fingers, and one of the kids asking if I can make them again next weekend.

These cinnamon rolls aren’t complicated. No weird ingredients or fussy steps. Just a little time, a little comfort, and a whole lot of payoff.

If your day’s been a lot, and you need something that feels like a reset this is it. Here’s the recipe.


📝 Ingredients

For the Dough:

  • 4 cups bread flour
  • 1 pack instant yeast (about 2 1/4 tsp)
  • 1 cup warm milk
  • 1/2 cup granulated sugar
  • 1/3 cup butter (softened)
  • 1 tsp salt
  • 2 eggs (room temp)

For the Filling:

  • 1 cup brown sugar
  • 3 tbsp ground cinnamon
  • 1/3 cup butter (softened)

For the Icing:

  • 1 1/2 cups powdered sugar
  • 1 tbsp vanilla extract
  • 1/8 tsp salt
  • 3 oz cream cheese (room temp)
  • 1 stick butter (softened)

👩‍🍳 How to Make Them

1. Make the Dough

  • In a large bowl or stand mixer, combine flour, sugar, salt, and yeast.
  • Add warm milk, softened butter, and eggs. Mix until dough forms.
  • Knead on medium speed (or by hand) for 10–12 minutes until smooth and stretchy.

2. Let It Rise

  • Shape the dough into a ball and place it in a lightly oiled bowl.
  • Cover with a towel and let it rise in a warm spot for about 1 hour or until doubled.

3. Roll It Out

  • Lightly flour your surface. Roll dough into a 16×12-inch rectangle, about 1/4 inch thick.
  • Mix together the filling (brown sugar, cinnamon, butter) and spread it evenly across the dough, leaving a 1/2-inch border.

4. Shape the Rolls

  • Starting from the long side, roll the dough into a tight log. Pinch the edge to seal.
  • Slice into 16 rolls using a sharp knife or unflavored dental floss for clean cuts.

🧁 Second Rise

After slicing the dough, I placed 10 rolls in a 13×9-inch pan and the remaining 6 rolls in a 10×6-inch dish. Make sure there’s a bit of space between each roll so they have room to expand.

I let them rise for at least 2 ½ hours and honestly, the extra time made them super light and fluffy. If your kitchen is cooler or you want that cloud-like texture, don’t rush this part. You’ll know they’re ready when they’ve puffed up and are almost touching.


5. Bake

  • Preheat oven to 350°F (175°C).
  • Bake for 30–35 minutes until golden brown and slightly crisp on top.

6. Make the Icing

  • Beat cream cheese until smooth.
  • Add butter and mix until creamy.
  • Slowly beat in powdered sugar, vanilla, and salt until light and fluffy.

7. Frost and Enjoy

  • Once the rolls are out of the oven and slightly cooled, slather them with icing.
  • Eat warm, and prepare to fall in love.

🔥 Tips & Tricks

  • Soft Butter Matters: For both the filling and the icing, make sure your butter is soft enough to spread but not melted.
  • Overnight Version: After slicing the rolls, refrigerate the trays overnight. Let rise for 1 hour at room temp before baking.
  • Storage: Keep leftover rolls in an airtight container up to 2 days. Microwave for 10–15 seconds to bring back the softness.
  • Freezer Friendly: Freeze baked rolls (no icing) up to 2 months. Reheat, frost, and serve.

🔍 Nutrition Facts (Per Roll)

Serving Size: 1 roll (1/16 of recipe)
Calories: ~340 kcal
Total Fat: 15g

  • Saturated Fat: 9g
  • Trans Fat: 0g
    Cholesterol: 55mg
    Sodium: 210mg
    Total Carbohydrates: 46g
  • Dietary Fiber: 1g
  • Sugars: 25g
    Protein: 5g

Homemade Cinnamon Rolls That Beat Cinnabon (Yes, I Said It)

Recipe by Tin-tin
Servings

16

servings
Calories

340

kcal

These homemade cinnamon rolls are pillowy soft, packed with cinnamon-sugar filling, and topped with a creamy vanilla icing. Perfect for holidays, weekends, or when you just want something cozy and sweet.

Ingredients

  • For the Dough:

  • 4 cups bread flour

  • 1 pack instant yeast (2 1/4 tsp)

  • 1 cup warm milk

  • 1/2 cup granulated sugar

  • 1/3 cup butter, softened

  • 1 tsp salt

  • 2 eggs, room temperature

  • For the Filling:

  • 1 cup brown sugar

  • 3 tbsp ground cinnamon

  • 1/3 cup butter, softened

  • For the Icing:

  • 1 1/2 cups powdered sugar

  • 1 tbsp vanilla extract

  • 1/8 tsp salt

  • 3 oz cream cheese, room temperature

  • 1 stick butter, softened

Directions

  • In a large bowl or stand mixer, combine the flour, sugar, salt, and yeast.
  • Add warm milk, softened butter, and eggs. Mix until a dough forms.
  • Knead for 10–12 minutes until smooth and elastic.
  • Shape the dough into a ball and place in a lightly oiled bowl.
  • Cover and let rise in a warm spot for 1 hour or until doubled in size.
  • Roll dough out to a 16×12-inch rectangle on a floured surface.
  • Mix the filling ingredients and spread evenly, leaving a 1/2-inch border.
  • Roll the dough tightly from the long edge. Pinch the seam to seal.
  • Slice into 16 equal rolls using a sharp knife or floss.
  • Place 10 rolls in a 13×9-inch pan and 6 in a 10×6-inch dish.
  • Cover and let rise for 2.5 hours until puffy and nearly touching.
  • Preheat oven to 350°F (175°C).
  • Bake for 30–35 minutes until golden brown and set.
  • Beat the cream cheese until smooth.
  • Add butter and beat until fluffy.
  • Gradually mix in powdered sugar, vanilla, and salt.
  • Let rolls cool slightly before spreading icing on top.
  • Serve warm and enjoy!

Notes

  • Soft Butter Matters: For both the filling and the icing, make sure your butter is soft enough to spread but not melted.
  • Overnight Version: After slicing the rolls, refrigerate the trays overnight. Let rise for 1 hour at room temp before baking.
  • Storage: Keep leftover rolls in an airtight container up to 2 days. Microwave for 10–15 seconds to bring back the softness.
  • Freezer Friendly: Freeze baked rolls (no icing) up to 2 months. Reheat, frost, and serve.

🥰 Final Thoughts

These rolls are soft, gooey, and every bit as good as the mall version—maybe even better because they’re homemade with love. It’s one of those recipes that turns an ordinary day into something special. They’re perfect for a weekend treat, brunch with guests, or just because you deserve something sweet.

If my crew of cinnamon-roll critics loved them, yours probably will too. Give them a try and let me know how they turn out!


A cozy Filipino favorite from my kitchen to yours.

When I moved to the US, I didn’t bring much just a few suitcases, some pictures, and a lot of memories. But I did bring the way I cook. Simple, no measuring spoons, just by feel. This Chicken Sopas became one of the first things I made when I was figuring out how to make this new life feel a little more like home.

It’s the kind of dish that fills the whole kitchen with the smell of garlic and onions, gets everyone asking, “What’s cooking?” and somehow makes even a regular weekday feel a little special. Over time, it turned into a favorite not just for my family here, but for friends and in-laws too. Every time I make it, someone ends up asking for the recipe, so I finally sat down and wrote it the way I make it.

This version is extra creamy, full of vegetables, and always enough to feed a crowd. It’s not fancy, but it’s comforting and sometimes, that’s exactly what you need.

Ingredients

  • 2953 grams (about 2.95 liters) water
  • 500 grams elbow macaroni
  • 1.3 lbs chicken breast or thigh, cut into small cubes
  • 2 tbsp fish sauce (for marinating chicken)
  • 1 medium onion, chopped
  • 1 tbsp minced garlic
  • 230 grams carrots, diced small
  • 450 grams cauliflower, cut into bite-sized florets
  • 250 grams potatoes, diced small
  • 200 grams cabbage, sliced into thin strips
  • 2 (12 oz) cans evaporated milk
  • 3 chicken Knorr cubes
  • 4 tbsp fish sauce (for final flavor)
  • 1332 grams (about 1.33 liters) more water
  • Ground black pepper, to taste

Instructions

1. Prep the Chicken

  • Cut chicken into small cubes.
  • Marinate with 2 tablespoons of fish sauce and a pinch of black pepper. Set aside.

2. Chop the Veggies

  • Dice carrots and potatoes into small, even cubes.
  • Cut cauliflower into small florets.
  • Slice cabbage into thin ribbons.

3. Boil the Macaroni

  • In a large pot, bring 2.95 liters of water to a boil.
  • Add chicken cubes and stir until dissolved.
  • Add elbow macaroni and cook until al dente.
  • Leave the pasta and broth in the pot — they’re the base of your soup.

4. Cook the Chicken and Veggies

  • In a pan, sauté onion and garlic until fragrant.
  • Add the marinated chicken and cook until no longer pink.
  • Stir in carrots and cauliflower and cook until starting to soften.
  • Add potatoes, then cabbage last, once potatoes are halfway cooked.
  • Cook until all veggies are just tender.

5. Combine Everything

  • Pour the chicken and veggie mix into the pot with the macaroni.
  • Add the remaining 1.33 liters of water and bring to a gentle boil.
  • Stir in both cans of evaporated milk.
  • Add 4 tablespoons of fish sauce and adjust with pepper to taste.
  • Let it simmer for 10 minutes to bring all the flavors together.

6. Serve Warm

  • Spoon into bowls and enjoy right away. It’s rich, cozy, and even better the next day.

Kitchen Notes

  • Try to keep chicken, carrots, and potatoes the same size so they cook evenly.
  • Cabbage goes in last since it softens quickly.
  • If you don’t have fish sauce, you can use salt just go slow and taste as you go.
  • For extra creaminess, add more evaporated milk or a splash of whole milk at the end.
  • Leftovers? Add a little water when reheating and it’s just as good (maybe even better).

🔍 Nutrition Estimate (per serving, based on 12 servings):

  • Calories: ~280
  • Protein: ~18g
  • Fat: ~9g
  • Carbohydrates: ~30g
  • Fiber: ~2g
  • Sodium: ~750mg

(Nutrition may vary slightly depending on ingredients used.)

The Chicken Sopas Recipe Everybody Keeps Asking Me For

Recipe by Tin-tin
Servings

10-12

servings
Calories

280

kcal

Ingredients

  • 2953 grams (about 2.95 liters) water

  • 500 grams elbow macaroni

  • 1.3 lbs chicken breast or thigh, cut into small cubes

  • 2 tablespoons fish sauce (for marinating chicken)

  • 1 medium onion, chopped

  • 1 tablespoon minced garlic

  • 230 grams carrots, diced small

  • 450 grams cauliflower, cut into small florets

  • 250 grams potatoes, diced small

  • 200 grams cabbage, sliced into thin strips

  • 2 (12 oz) cans evaporated milk

  • 3 chicken Knorr cubes

  • 4 tablespoons fish sauce (for final flavor)

  • 1332 grams (about 1.33 liters) additional water

  • Ground black pepper, to taste

  • Cooking oil (for sautéing)

Directions

  • Marinate the Chicken: Cut chicken into small cubes. Marinate with 2 tablespoons of fish sauce and a pinch of black pepper. Set aside.
  • Prepare the Vegetables: Dice carrots and potatoes into small cubes. Cut cauliflower into bite-sized florets. Slice cabbage into thin strips.
  • Cook the Macaroni: In a large pot, bring 2.95 liters of water to a boil. Add the 3 chicken cubes and stir to dissolve. Add macaroni and cook until al dente. Do not drain.
  • Sauté the Chicken and Veggies: In a separate pan, heat oil and sauté onion and garlic until fragrant. Add marinated chicken and cook until browned. Add carrots and cauliflower and cook until slightly softened. Add potatoes, then cabbage last. Cook until all vegetables are just tender.
  • Combine and Simmer: Transfer the chicken and vegetables into the pot with macaroni and broth. Add the additional 1.33 liters of water and bring to a gentle boil. Pour in the evaporated milk. Add 4 tablespoons of fish sauce and pepper to taste. Simmer for 10 minutes to bring everything together.
  • Serve Hot: Ladle into bowls and serve warm. Enjoy!

Notes

  • Try to cut chicken, carrots, and potatoes into similar sizes for even cooking.
  • Cabbage cooks quickly, so add it toward the end.
  • Fish sauce brings deep flavor, but you can substitute salt carefully if needed.
  • For creamier soup, add more evaporated milk or a splash of whole milk.
  • Sopas thickens over time. Add a bit of water or milk when reheating.

This dish will always remind me of rainy afternoons in the Philippines and now, of the times I get to share it here with family and friends. I hope it brings the same kind of comfort to your table too.


I’ll be honest, when I got invited to that party, I thought, “Cool, I’ll just bring something simple.” Fast forward to two hours before it started, and I had zero plan. Chips? Boring. Store-bought cake? Felt lazy. That’s when it hit me: cookies. But not just any cookies. If I was going to pull this off, they had to look and taste like I actually tried.

That’s how these Red Velvet Cookies with Cream Cheese Filling were born. They are rich, soft, and a little fancy without being fussy. The creamy filling gives them a wow factor, but honestly, they are easier than they look. I brought them to the party, and they were a total hit. People could not stop talking about them. I got so many compliments, and one person even called them “evil” because they tasted way too good. Pretty sure that is the best review you can get.

Here is the recipe that saved me, and will probably save you too one day.


Red Velvet Cookie Dough

  • 2 ½ cups all-purpose flour
  • 2 tablespoons cocoa powder
  • 1 tablespoon red food coloring
  • ½ teaspoon baking soda
  • 1 ½ teaspoons baking powder
  • Pinch of salt
  • 10 tablespoons unsalted butter (softened)
  • ½ cup light brown sugar
  • ⅓ cup granulated sugar
  • 1 large egg
  • 2 tablespoons water

Cream Cheese Filling

  • 8 ounces cream cheese (softened)
  • ¼ cup granulated sugar
  • ½ teaspoon vanilla extract

How to Make Them

Step 1: Make the filling first.
Mix the cream cheese, sugar, and vanilla together until smooth. Scoop out small teaspoon-sized portions onto a parchment-lined plate and freeze them while you make the cookie dough. This keeps the centers creamy but not runny when you bake.

Step 2: Start the dough.
In a bowl, whisk the flour, cocoa powder, baking soda, baking powder, and salt together.

In another large bowl, cream the butter, light brown sugar, and granulated sugar until light and fluffy. Add the egg, water, and red food coloring, and beat until smooth.

Slowly add the dry ingredients into the wet ingredients, mixing just until combined. Do not overmix or you will end up with tough cookies.

Step 3: Chill the dough.
Cover the dough and refrigerate it for 30 minutes. This makes it much easier to shape later and helps the cookies stay thick and soft.

Step 4: Assemble the cookies.
Scoop about 65 grams of dough for each cookie. Flatten each dough ball slightly, place a frozen ball of cream cheese filling in the center, and carefully seal it up, rolling it into a neat ball. Make sure the filling is completely hidden inside.

Step 5: Bake.
Preheat your oven to 350°F (175°C). Line a baking sheet with parchment paper. Bake the cookies for 13 to 15 minutes until they are just set around the edges but still soft in the center.

Let them cool on the baking sheet for a few minutes before transferring them to a wire rack to cool completely. Good luck not eating them straight off the tray.


Tips and Notes

  • Do not skip chilling the dough. It keeps the cookies from spreading too much and makes them easier to work with.
  • Weigh your dough. 65 grams per cookie gives you that perfect bakery-style size with the right dough-to-filling ratio.
  • Handle gently when sealing. Press just enough to cover the filling without overworking the dough.
  • Freeze the filling properly. About 30 minutes in the freezer is ideal. You want it firm but still scoopable.
  • Storage tip: Keep leftover cookies in an airtight container in the fridge. They taste even better the next day as the flavors settle.

Estimated Nutrition (Per Cookie)

Nutrient Amount

Calories ~215 kcal

Carbs ~26g

Fat ~11g

Saturated Fat ~7g

Protein ~3g

Sugar ~16g

Nutrition estimates are based on 16 cookies and may vary depending on ingredient brands.


The “Evil” Red Velvet Cookies

Recipe by Tin-tin
Servings

16

servings
Calories

215

kcal

Ingredients

  • 2 ½ cups all-purpose flour

  • 2 tablespoons cocoa powder

  • 1 tablespoon red food coloring

  • ½ teaspoon baking soda

  • 1 ½ teaspoons baking powder

  • Pinch of salt

  • 10 tablespoons unsalted butter (softened)

  • ½ cup light brown sugar

  • ⅓ cup granulated sugar

  • 1 large egg

  • 2 tablespoons water

  • Cream Cheese Filling:

  • 8 ounces cream cheese (softened)

  • ⅓ cup granulated sugar

  • ½ teaspoon vanilla extract

Directions

  • Make the filling: Mix the cream cheese, sugar, and vanilla until smooth. Scoop small teaspoon-sized balls onto parchment paper and freeze for about 30 minutes.
  • Prepare the dough: Whisk the flour, cocoa powder, baking soda, baking powder, and salt together. In another bowl, cream the butter and sugars until fluffy. Add the egg, water, and red food coloring, and beat until smooth. Add the dry ingredients and mix until just combined.
  • Chill the dough: Cover the dough and refrigerate for 30 minutes.
  • Assemble the cookies: Scoop 65 grams of dough for each cookie. Flatten slightly, place a frozen cream cheese ball in the center, and seal the dough around it.
  • Bake: Preheat oven to 350°F (175°C). Line baking sheets with parchment paper. Bake cookies for 13 to 15 minutes until just set around the edges but still soft in the center.
  • Cool: Let cookies cool on the baking sheet for a few minutes before transferring to a wire rack to cool completely.

Notes

  • Chilling the dough prevents overspreading and keeps the cookies thick.
  • Weighing each dough ball to 65 grams ensures even baking and the perfect ratio of dough to filling.
  • Freeze the cream cheese balls properly to avoid leaking during baking.
  • Store leftover cookies in an airtight container in the fridge. They taste even better the next day.

Final Say

Next time you need a show-stopping dessert but you are short on time, or you just want something dangerously delicious, these red velvet cookies are the answer. They look impressive, taste even better than they look, and somehow feel special without a lot of stress.

And if someone at your party calls them “evil,” just smile and take it as the compliment it is.

Happy baking!


If you’ve ever craved a soft, melt-in-your-mouth sponge roll that feels like a cross between mamon and a jelly roll, you’re about to fall in love with this Filipino classic Pianono. Light, airy, and just sweet enough, it’s the kind of treat that disappears as fast as you can slice it. And the best part? It’s made with simple pantry staples and that nostalgic combo of margarine and sugar that takes you straight back to childhood.

This beginner-friendly recipe delivers bakery-style results without any fancy ingredients or equipment. Whether you’re baking for your family, sharing with friends, or just want a simple sweet treat with your afternoon coffee, this Pianono recipe is always a winner.


Ingredients

Sponge Cake:

  • 1 cup King Arthur cake flour
  • 1 tsp baking powder
  • Pinch of salt
  • ¼ cup white sugar
  • ¼ cup vegetable oil
  • ½ cup water
  • 4 egg yolks
  • 4 egg whites
  • ¼ cup white sugar (for meringue)
  • Pinch of cream of tartar

Filling & Topping:

  • Margarine (softened, for spreading inside and on top)
  • White sugar (to sprinkle generously)

Step-by-Step Instructions

1. Preheat and Prepare

Preheat oven to (350°F). Line a 10×15-inch jelly roll pan with parchment paper and lightly grease it with margarine.

2. Make the Yolks Batter

In a mixing bowl, whisk together:

  • 4 egg yolks
  • ¼ cup white sugar
  • ¼ cup vegetable oil
  • ½ cup water

Sift in:

  • 1 cup King Arthur cake flour
  • 1 tsp baking powder
  • Pinch of salt

Mix just until smooth—do not over-beat.

3. Whip the Meringue

In a clean, grease-free bowl, beat 4 egg whites with a pinch of cream of tartar until foamy. Slowly add ¼ cup sugar and continue beating until stiff peaks form.

4. Fold the Batters

Fold the meringue into the yolk mixture in three additions. Use gentle folding motions to maintain the batter’s volume and fluffiness.

5. Bake the Sponge

Pour the batter into the prepared pan. Spread evenly and tap gently to release air bubbles. Bake for 20–25 minutes, or until the cake springs back when lightly touched.

6. Roll While Warm

Remove from the oven and immediately flip the cake onto a clean parchment paper or towel dusted with sugar. Carefully peel off the bottom parchment. While still warm, roll the cake (without filling) from the short side and let it cool rolled up. This helps prevent cracks later.

7. Add the Filling

Unroll the cooled cake. Spread a thin layer of softened margarine over the surface. Sprinkle generously with white sugar. Roll the cake back up tightly.

8. Spread on Top

Lightly spread more margarine on the outside of the roll to keep it soft and give it a glossy, inviting finish.

9. Slice and Serve

Cut into even slices, about 1-inch thick. Enjoy with coffee, juice, or as a sweet merienda.


Storage Tips

  • Room Temp: Best enjoyed within 1 day
  • Refrigerated: Up to 3 days (bring to room temp or warm slightly before serving)
  • Freezer: Wrap tightly in plastic wrap and foil, keeps well for up to 2 weeks

Baking Notes and Tips

  • Use fresh eggs – They whip up better and give more stable meringue.
  • Stiff peaks matter – Under-beaten egg whites can cause a dense, flat sponge.
  • Avoid overmixing – It will deflate the batter and result in a tough texture.
  • Don’t overbake – Once it springs back to the touch, it’s done. Dry sponge will crack.
  • Roll while warm – This “trains” the cake to roll without splitting later.
  • Choose flavorful margarine – Since it’s the main filling, taste matters.
  • Use a flexible spatula – Makes folding easier and more precise.
  • Try baking one test roll first – Especially if it’s your first time or you’re scaling up.

📊 Nutrition Info (Per Slice)

Serving Size: 1 slice (1 of 12)
Calories: ~155 kcal

  • Total Fat: 8.5g
    • Saturated Fat: 1.8g
  • Cholesterol: 85mg
  • Sodium: 75mg
  • Carbohydrates: 17g
    • Sugars: 10g
    • Fiber: 0.3g
  • Protein: 3g

Note: This is an estimate based on 12 slices per roll using standard ingredients and margarine filling. Values may vary depending on exact brands and measurements used.


Classic Filipino Pianono with Margarine and Sugar Filling

Recipe by Tin-tin
Servings

12

servings
Calories

155

kcal

Ingredients

  • 1 cup King Arthur cake flour

  • 1 tsp baking powder

  • Pinch of salt

  • ¼ cup white sugar

  • ¼ cup vegetable oil

  • ½ cup water

  • 4 egg yolks

  • 4 egg whites

  • ¼ cup white sugar (for meringue)

  • Pinch of cream of tartar

  • For the Filling & Topping:

  • Softened margarine (for spreading inside and on top)

  • White sugar (sprinkle generously)

Directions

  • Preheat oven to 350°F and line a 10×15 jelly roll pan with parchment paper. Lightly grease with margarine.
  • In a bowl, whisk together egg yolks, ¼ cup sugar, vegetable oil, and water.
  • Sift in cake flour, baking powder, and salt. Mix gently just until smooth.
  • In a separate bowl, beat egg whites and cream of tartar until foamy. Add ¼ cup sugar and beat until stiff peaks form.
  • Fold meringue into yolk batter in three additions using gentle strokes.
  • Pour batter into prepared pan, spread evenly, and tap to release bubbles. Bake for 20–25 minutes or until springy to the touch.
  • Flip cake onto sugared parchment or towel. Peel off parchment and roll while warm. Let it cool rolled up.
  • Unroll, spread softened margarine, sprinkle sugar, and re-roll tightly.
  • Lightly spread more margarine on the outside for a glossy finish.
  • Slice into 1-inch pieces and serve.

Notes

  • Use cake flour for a finer, more delicate crumb.
  • Rolling while warm prevents cracks in the sponge.
  • Margarine is traditional but can be swapped with butter for a richer flavor.
  • Store leftovers in a container at room temperature for 2–3 days. Best enjoyed fresh.

Why I Love Pianono

I love Pianono, and this was one of my favorite snacks growing up. Almost every bakery in the Philippines has them wrapped in plastic, lined up in trays, always waiting near the cashier. You’d see it whether you’re in the city or the province. It’s soft, a little sweet, and always felt special even if it was just a few pesos. That first bite fluffy sponge, margarine, and sugar was always the best part of merienda for me. Now that I bake my own, I love sharing that same feeling with my family.


So whether you’re baking for loved ones or just craving a taste of something familiar and comforting, this classic Pianono is always a sweet place to start.


There’s something special about recipes that never left your kitchen growing up. For us, Picadillo was one of those dishes. It’s the kind of meal you make when you want something hearty but simple, sweet but savory, and always satisfying with a big bowl of rice.

We loved making this as kids because it was so easy, and now we’ve added a few little touches like shredded cheese and thickened sauce that make it even better without complicating the recipe.

Ingredients:

  • 1 1/2 lbs ground pork
  • 275g carrots, diced small
  • 260g potatoes, diced small
  • 1 medium onion, chopped
  • 5 cloves garlic, minced
  • 1/4 cup soy sauce
  • 15 oz + 8 oz tomato sauce (total 23 oz)
  • 1 1/2 cups water
  • 65g bell pepper, chopped
  • 1/4 cup brown sugar
  • 1/2 tsp Goya seasoning
  • 1 tsp salt (adjust to taste)
  • 1/4 tsp black pepper
  • 1/2 cup shredded cheddar cheese
  • 1 tbsp flour mixed with 1/4 cup water (for thickening)

Instructions:

  1. Sauté the aromatics:
    In a large pan, heat oil over medium. Sauté the garlic until fragrant, then add the onion and cook until soft and translucent.
  2. Brown the pork:
    Add the ground pork. Cook until browned and the fat begins to render. Break it apart as it cooks.
  3. Add soy sauce and tomato sauce:
    Stir in the soy sauce and both cans of tomato sauce. Let it simmer for about 5–7 minutes to let the flavors blend.
  4. Add water and bring to a simmer:
    Pour in 1 1/2 cups of water and let it gently simmer.
  5. Add the vegetables:
    Once the water is simmering, add diced carrots and potatoes. Cover and cook for 10–12 minutes until they’re fork-tender.
  6. Season and sweeten:
    Add brown sugar, Goya seasoning, salt, and pepper. Taste and adjust depending on whether you want it sweeter or saltier.
  7. Thicken the sauce:
    Stir in the flour-water mixture gradually and simmer for 2–3 minutes until the sauce thickens.
  8. Add the cheese:
    Mix in the shredded cheddar cheese. Let it melt completely into the sauce for a creamy, savory finish.
  9. Toss in the bell pepper:
    Add the chopped bell pepper and let it cook for just 2 more minutes to keep the texture and color.
  10. Serve and enjoy:
    Serve hot over rice, inside pandesal, or use it as empanada filling. It’s a dish that never gets old.

Time & Servings:

  • Prep time: 10–15 minutes
  • Cook time: 30 minutes
  • Total time: 40–45 minutes
  • Yields: 6 servings

Nutrition (Per Serving, Approximate):

  • Calories: 430
  • Protein: 22g
  • Fat: 28g
  • Carbohydrates: 22g
  • Sugar: 9g
  • Fiber: 3g
  • Sodium: ~850mg
  • Calcium: ~10% DV (mostly from cheese)

Note: Values are estimated using standard ingredients. Exact numbers may vary based on brands used, portion size, and substitutions like beef vs pork.


Tips & Notes:

  • Shortcut tip: Pre-boil carrots and potatoes if you’re short on time.
  • Cheese options: Mozzarella, Eden, or Monterey Jack all work well.
  • Want it saucier? Just add a bit more water before thickening.
  • More veggies? Add green peas, corn, or chopped spinach near the end.
  • Alternative meat: You can use beef or a mix of pork and beef.
  • Storage: Keeps in the fridge for 3–4 days. Gets even tastier the next day!

Easy Picadillo Recipe (Filipino Style, Saucy and Sweet!)

Recipe by Tin-tin
Servings

6

servings
Calories

430

kcal

A comforting Filipino dish that’s savory, sweet, and packed with tender veggies and pork in a rich tomato sauce. Serve it with rice, stuff it into pandesal, or use it as empanada filling!

Ingredients

  • 1½ lbs ground pork

  • 275g carrots, diced small

  • 260g potatoes, diced small

  • 1 medium onion, chopped

  • 5 cloves garlic, minced

  • ¼ cup soy sauce

  • 23 oz tomato sauce (15 oz + 8 oz)

  • 1½ cups water

  • 65g bell pepper, chopped

  • ¼ cup brown sugar

  • ½ tsp Goya seasoning

  • 1 tsp salt (adjust to taste)

  • ¼ tsp black pepper

  • ½ cup shredded cheddar cheese

  • 1 tbsp flour mixed with ¼ cup water (for thickening)

Directions

  • Sauté the garlic in oil over medium heat until fragrant. Add chopped onion and cook until translucent.
  • Add ground pork. Cook until browned, breaking it apart as it cooks.
  • Stir in soy sauce and both cans of tomato sauce. Simmer for 5–7 minutes to combine flavors.
  • Add 1½ cups of water and bring to a gentle simmer.
  • Add diced carrots and potatoes. Cover and cook for 10–12 minutes or until tender.
  • Add brown sugar, Goya seasoning, salt, and pepper. Taste and adjust as needed.
  • Mix 1 tbsp flour with ¼ cup water. Stir into the pan and simmer for 2–3 minutes until thickened.
  • Add shredded cheddar cheese. Stir until melted and smooth.
  • Add chopped bell pepper and cook for 2 more minutes.
  • Serve hot over rice, inside pandesal, or as empanada filling.

Notes

  • Use lean ground pork if you want a less oily version. You can also drain excess fat after browning.
  • Tomato sauce substitute: You can use fresh tomatoes (about 5 large ones, blended) and 1 tablespoon tomato paste for a more homemade taste.
  • Cheddar cheese adds a creamy twist to this classic dish—optional but highly recommended for added richness.
  • Goya seasoning gives a quick umami boost, but you can skip it or use a dash of Knorr seasoning instead.
  • Make-ahead tip: This dish tastes even better the next day as the flavors continue to develop.
    Storage: Keeps in the fridge for 3–4 days. Freezes well for up to 2 months in airtight containers.

Why We Still Love It

This isn’t just a recipe it’s a piece of our childhood. That comforting smell of garlic, tomato sauce, and melted cheese always brings us back. It’s easy, affordable, and always hits the spot. Whether you’re a beginner in the kitchen or just craving something homey, this Filipino-style Picadillo is a winner every single time.

There’s something special about baking cookies the warm aroma of cinnamon filling the kitchen, the anticipation as they bake, and the first bite into something soft and sweet. These snickerdoodle cookies are an absolute favorite in our home, and I’m so excited to share this recipe with you.

It all started when my husband tried them for the first time. He immediately declared them his favorite cookie ever. Now, he asks for them so often that I’ve practically memorized the recipe. Whether it’s a weekend treat or a surprise pick-me-up after a long day, these cookies never disappoint. They’re quick to make, fun to bake, and always a family favorite.

I love making these cookies not only because they’re delicious, but also because they bring us all together. While my husband doesn’t bake, he’s always the first to grab a warm cookie off the tray, and my kids hover around the oven waiting for the timer to ding. Baking these has become more than just making dessert it’s turned into a fun family tradition where everyone looks forward to the end result.

Over the years, they’ve become my go-to recipe. I make them for cozy evenings at home, family movie nights, and even lazy Sunday afternoons when we’re craving something sweet. It’s one of those recipes that feels effortless but tastes like you spent hours in the kitchen.

What makes these snickerdoodles stand out? It’s the perfect combination of buttery softness, a slight tang from the cream of tartar, and a warm cinnamon-sugar coating that melts in your mouth. They’re crisp around the edges, chewy in the center, and impossible to resist.

So, let’s get baking! Grab your ingredients, preheat your oven, and get ready for the best snickerdoodles you’ve ever tasted. 😋


Ingredients:

For the Dough:

  • 2 cups all-purpose flour
  • 1 teaspoon cinnamon powder
  • 1/2 teaspoon salt
  • 1 teaspoon cream of tartar
  • 1 teaspoon baking soda
  • 1 tablespoon vanilla extract
  • 1 large egg
  • 1/2 cup brown sugar
  • 3/4 cup granulated sugar
  • 1 cup (2 sticks) unsalted butter, at room temperature (make sure it’s soft)

For the Cinnamon-Sugar Coating:

  • 1 tablespoon cinnamon powder
  • 3 tablespoons granulated sugar

Note: Feel free to adjust the cinnamon and sugar mixture to your taste! Add more if you like extra sweetness or spice.


Instructions:

Step 1: Mix the Dry Ingredients
In a large mixing bowl, whisk together the flour, cinnamon powder, salt, cream of tartar, and baking soda. Add the brown sugar and granulated sugar, and mix until evenly combined.

Step 2: Add the Wet Ingredients
Make a well in the center of the dry mixture. Add the egg, softened butter, and vanilla extract. Use a hand or stand mixer to blend until a smooth dough forms. Scrape down the sides of the bowl to ensure everything is incorporated.

Step 3: Chill the Dough
Cover the bowl with plastic wrap and refrigerate the dough for 30 minutes. This helps reduce spreading and gives you thicker, chewier cookies.

Step 4: Preheat the Oven
After chilling, preheat your oven to 350°F (177°C) and line a baking sheet with parchment paper.

Step 5: Prepare the Cinnamon-Sugar Coating
In a small bowl, mix 1 tablespoon cinnamon powder with 3 tablespoons granulated sugar. This mixture will coat the cookie dough balls.

Step 6: Shape the Dough
Scoop and roll the chilled dough into small balls, about 1 tablespoon each. Use a cookie scoop for uniform size. Roll each ball in the cinnamon-sugar mixture until fully coated.

Step 7: Arrange on Baking Sheet
Place the dough balls on the prepared baking sheet, spacing them about 2½ inches apart.

Step 8: Bake the Cookies
Bake for 12–13 minutes, or until the edges are set but the centers still look slightly soft. Don’t overbake for soft, chewy centers.

Step 9: Cool and Enjoy
Let the cookies cool on the baking sheet for 5–10 minutes, then transfer to a wire rack to cool completely. They’ll continue to set as they cool.


✏️ Notes & Tips

Want crispier cookies? Bake 1–2 minutes longer.

Chilling the dough is key for thick, bakery-style cookies that don’t overspread.

For extra cinnamon flavor, add a pinch directly into the dough in Step 1.

You can freeze the dough balls after coating in cinnamon sugar. Bake from frozen at 350°F for 13–14 minutes.

Store cooled cookies in an airtight container at room temperature for up to 4 days—they stay soft!


Nutrition Info (Per Cookie)

Serving Size: 1 tbsp cookie (~14g)
Yield: Makes about 44 cookies
Calories: ~95 kcal

  • Total Fat: 5.8g (Saturated: 3.5g)
  • Cholesterol: 13mg
  • Sodium: 80mg
  • Carbohydrates: 10.8g
    • Sugars: 6.8g
    • Fiber: 0.3g
  • Protein: 0.8g

Note: This is an estimate and may vary depending on brands and exact ingredient measurements.


Perfect Snickerdoodles – A Family Favorite Recipe

Recipe by Tin-tin
Servings

44

servings
Calories

95

kcal

Soft, chewy, and warmly spiced these snickerdoodles are rolled in cinnamon-sugar for that perfect crisp edge and fluffy center.

Ingredients

  • 2 cups all-purpose flour

  • 1 teaspoon cinnamon powder

  • 1/2 teaspoon salt

  • 1 teaspoon cream of tartar

  • 1 teaspoon baking soda

  • 1 tablespoon vanilla extract

  • 1 large egg

  • 1/2 cup brown sugar

  • 3/4 cup granulated sugar

  • 1 cup (2 sticks) unsalted butter, softened

  • For the Cinnamon-Sugar Coating:

  • 1 tablespoon cinnamon powder

  • 3 tablespoons granulated sugar

Directions

  • In a large mixing bowl, whisk together the flour, cinnamon powder, salt, cream of tartar, baking soda, brown sugar, and granulated sugar until well combined.
  • Add the egg, softened butter, and vanilla extract. Mix with a hand or stand mixer until a smooth dough forms.
  • Cover the dough and refrigerate for 30 minutes to prevent spreading during baking.
  • Once chilled, preheat the oven to 350°F (177°C) and line a baking sheet with parchment paper.
  • In a small bowl, mix 1 tablespoon cinnamon powder with 3 tablespoons granulated sugar.
  • Roll the dough into 1-tablespoon-sized balls. Coat each ball in the cinnamon-sugar mixture.
  • Arrange the dough balls on the baking sheet, spacing them 2½ inches apart.
  • Bake for 12–13 minutes, or until the edges are set and the centers look slightly soft.
  • Let the cookies cool on the baking sheet for 5–10 minutes before transferring to a wire rack to cool completely.

Notes

  • Chilling the dough is important for thicker, chewier cookies and prevents them from spreading too much during baking.
  • For extra cinnamon flavor, add a pinch directly into the dough.
  • You can freeze the dough balls (already coated in cinnamon-sugar) and bake straight from frozen. Just add 1–2 minutes to the bake time
  • Store baked cookies in an airtight container at room temperature for up to 4 days.
  • For crispier cookies, bake 1–2 minutes longer, but don’t over bake if you prefer them soft and chewy in the center.

Why You’ll Love This Recipe

These snickerdoodle cookies are the perfect combination of sweet, buttery, and cinnamon-spiced goodness. Whether you’re making them for a family night, a cozy evening in, or just because you’re craving something delicious, they never disappoint. My family loves them, and I hope yours will too! ❤️

Let me know how yours turn out—I’d love to hear your feedback in the comments below. Happy baking and God bless! 😊


“Mom, you’re the best cook ever.”
That’s what I heard after dinner and honestly, I could’ve floated right out of the kitchen.

And here’s the real kicker that compliment came from my daughter, the picky one. The one who usually looks suspiciously at anything that isn’t beige, crunchy, or shaped like a chicken nugget. So when she said she loved this dish, I knew it was a win.

I didn’t even plan this meal. It started with one of those “what can I throw together” kind of nights. I had a pack of keilbasa, some shrimp I forgot I had in the freezer, a lonely half jar of sun-dried tomatoes, and a dream. So I started cooking, no recipe, just going with what felt right.

First, I browned the sausage until it had that crispy, golden edge. Then I gave the shrimp a quick fry until they turned pink and perfect. The garlic and sun-dried tomatoes went in next, and the whole kitchen suddenly smelled like a five-star restaurant. I added cream, some herbs, a touch of flour to thicken, and a handful of spinach to make me feel like I was being responsible.

Everything was going amazing. And then I realized something.
I had no noodles. None.
The sauce was done, the shrimp were resting, the sausage was ready but the pasta? Missing in action. I stood in the kitchen in disbelief. Checked every cabinet, twice. Nothing. So I turned off the heat, left everything on the stove, grabbed my wallet, and ran to the store in slippers just to grab a box of fettuccine. Yes, I was that committed.

When I got back, I finished the dish, tossed it all together, and served it to my family like it was a dish I planned all week. And they loved it. Everyone went back for seconds, there were no leftovers, and I got called the best cook ever. Worth it? Every single step.

Here’s the recipe plus a few tips from someone who now always checks the pantry first.


Ingredients:

  • 1 keilbasa sausage, sliced
  • 30 pieces large shrimp, peeled and deveined
  • 3 cups heavy whipping cream
  • 1 cup water (½ cup for sauce, ½ cup for flour slurry)
  • 2 tbsp flour
  • 2–3 cloves garlic, minced
  • ½ jar (from 8.5 oz jar) sun-dried tomatoes, chopped
  • 1 handful fresh spinach
  • ½ tsp thyme
  • ½ tsp parsley
  • 1 tsp salt
  • ¼ tsp pepper
  • Goya seasoning (to taste)
  • Cooked pasta (fettuccine, penne, or any kind you like)

Instructions:

  1. Sear the sausage:
    In a large skillet, cook the sliced keilbasa over medium heat until browned and slightly crispy. Remove and set aside.
  2. Cook the shrimp:
    In the same pan, add the shrimp and sauté until pink, about 2–3 minutes. Remove and set aside with the sausage.
  3. Sauté aromatics:
    Add the minced garlic and sun-dried tomatoes to the pan. Sauté for 1–2 minutes until fragrant.
  4. Build the sauce:
    Pour in 3 cups of heavy cream and ½ cup of water. Bring to a gentle boil.
  5. Thicken it:
    In a small bowl, mix the remaining ½ cup of water with 2 tbsp flour. Stir until smooth, then slowly pour into the sauce while stirring to avoid lumps.
  6. Season:
    Add thyme, parsley, salt, pepper, and Goya seasoning (if using). Let the sauce simmer for about 3–5 minutes until slightly thickened.
  7. Finish the dish:
    Add spinach, shrimp, and sausage back into the sauce. Cook until the spinach is wilted and everything is heated through.
  8. Serve:
    Toss with cooked pasta and serve warm. Top with a little grated cheese if you like, but it’s perfect as-is.

Tips & Notes:

  • Don’t skip the sun-dried tomatoes. They give the sauce a rich, tangy depth that fresh tomatoes just can’t match.
  • Use raw shrimp. Pre-cooked shrimp can get rubbery in the sauce. Fresh or frozen raw shrimp work best.
  • Goya seasoning is optional but gives a delicious savory boost. Add it gradually and taste as you go.
  • Make it spicy: Add red pepper flakes with the garlic if your family likes a kick.
  • No noodles? It also works over rice or mashed potatoes in a pinch. But, you know, check your pantry first.

📊 Nutrition Info (Per Serving | Makes 6 servings)

Calories: ~585 kcal
Total Fat: 44g
• Saturated Fat: 24g
Cholesterol: 170mg
Sodium: 1020mg
Carbohydrates: 28g
• Sugars: 4g
• Fiber: 1.5g
Protein: 26g

Note: Nutrition is estimated using standard cream, sausage, and shrimp portions. Pasta assumed to be ~1½ cups cooked per serving. Actual values may vary based on ingredient brands and exact measurements.


Creamy Shrimp and Keilbasa in Sun-Dried Tomato Sauce

Recipe by Tin-tin
Servings

6

servings
Calories

585

kcal

This rich and comforting pasta combines smoky kielbasa, juicy shrimp, and a creamy garlic sundried tomato sauce that clings to every bite. It’s a guaranteed crowd pleaser!

Ingredients

  • 1 kielbasa sausage, sliced

  • 30 large shrimp, peeled and deveined

  • 3 cups heavy whipping cream

  • 1 cup water (½ for sauce, ½ for slurry)

  • 2 tbsp flour

  • 2–3 cloves garlic, minced

  • ½ jar (from 8.5 oz jar) sun-dried tomatoes, chopped

  • 1 handful fresh spinach

  • ½ tsp thyme

  • ½ tsp parsley

  • 1 tsp salt

  • ¼ tsp pepper

  • Goya seasoning, to taste

  • Cooked pasta, any type (fettuccine or penne works great)

Directions

  • Sear the sausage: In a large skillet over medium heat, cook the kielbasa slices until browned and crispy. Set aside.
  • Cook the shrimp: In the same pan, sauté the shrimp for 2–3 minutes until pink. Remove and set aside with the sausage.
  • Sauté the aromatics: Add garlic and chopped sun-dried tomatoes to the pan. Cook for 1–2 minutes until fragrant.
  • Build the sauce: Pour in the heavy cream and ½ cup water. Bring to a gentle boil.
  • Thicken the sauce: In a bowl, mix the remaining ½ cup water with the flour. Slowly add to the pan while stirring to avoid lumps.
  • Season: Add thyme, parsley, salt, pepper, and Goya seasoning. Simmer for 3–5 minutes until the sauce thickens.
  • Finish the dish: Add spinach, shrimp, and sausage back in. Stir until heated through and spinach is wilted.
  • Serve: Toss with cooked pasta and serve warm. Optional: top with grated cheese.

Notes

  • Don’t skip the sun-dried tomatoes—they give depth that fresh ones don’t.
  • Raw shrimp > pre-cooked shrimp for best texture.
  • Spicy twist: Add chili flakes with the garlic.
  • Out of noodles? Serve over rice or mashed potatoes. (Yes, we’ve been there.)

Make it your own.
This is one of those meals you can easily customize/swap the shrimp for chicken, or use all veggies if you’re out of meat. The sauce is the real star here, and once you make it, you’ll probably want to put it on everything.

Let me know if you try this!
And if your picky eaters ask for seconds? You’ve officially earned your crown too.


Hi there, sweet friends! 💕

I’m so excited to share one of my absolute favorite recipes with you—these rich, fudgy brownies that are always the first dessert to disappear when I make them. They’re soft, chewy, and loaded with chocolatey goodness—the kind of treat that feels like a warm hug in every bite.

I can’t even count how many times my kids and friends have begged me to whip up another batch of these brownies. They’re my go-to for family nights, bake sales, or whenever we need a little chocolate fix (which, let’s be honest, is pretty often around here!).

What I love most about this recipe is how simple and foolproof it is. No fancy mixers or complicated steps—just basic pantry ingredients and lots of love. Plus, they’re ready in no time, making them perfect for those “I need chocolate NOW” moments!

So, whether you’re baking for a party, surprising your kiddos, or just treating yourself (you totally deserve it!), these brownies are sure to win hearts and satisfy cravings. Let’s get baking! 🍫✨


Ingredients You’ll Need 🛒

Here’s everything you need to whip up these decadent brownies. Most ingredients are pantry staples, so you might already have them on hand!

Dry Ingredients:

  • 1 cup all-purpose flour – Gives structure to the brownies.
  • 1 cup light brown sugar – Adds moisture and a slight caramel flavor.
  • 1 cup white sugar – Provides sweetness and helps create a crackly top.
  • 1 cup unsweetened cocoa powder – Use high-quality cocoa for rich flavor.
  • 1 tsp salt – Balances the sweetness and enhances flavor.
  • 1/2 tsp baking powder – Provides a slight lift for a chewy texture.

Wet Ingredients:

  • 1 cup melted butter (cooled) – Adds richness and moisture.
  • 2 tbsp vegetable oil – Ensures the brownies stay soft and fudgy.
  • 1 tbsp vanilla extract – Enhances the chocolate flavor.
  • 4 large eggs – Gives structure and binds the ingredients together.

Mix-Ins:

  • 1 cup semi-sweet chocolate chips – Melts into gooey pockets of chocolate inside. Add extra for topping!

Step-by-Step Directions 👩‍🍳

1. Prep Your Pan and Oven.

Preheat your oven to 350°F (175°C). Grease a 9×11-inch baking pan with oil or butter, then line it with parchment paper, leaving some overhang for easy removal later.


2. Mix the Dry Ingredients.

In a large mixing bowl, whisk together:

  • Flour
  • Brown sugar
  • White sugar
  • Cocoa powder
  • Salt
  • Baking powder

Set this aside while you prepare the wet ingredients.


3. Combine the Wet Ingredients.

In another bowl, mix the cooled melted butter, vegetable oil, and vanilla extract until smooth.


4. Add the Eggs.

Beat in the eggs one at a time, making sure each egg is fully incorporated before adding the next. This step ensures the batter is rich and smooth.


5. Mix Wet and Dry Ingredients.

Gradually add the wet mixture to the dry ingredients. Use a hand mixer or stand mixer on low speed to combine until you get a thick, smooth batter. Be careful not to overmix!


6. Fold in the Chocolate Chips.

Gently fold in the chocolate chips with a spatula to distribute them evenly throughout the batter.


7. Pour and Spread the Batter.

Transfer the batter into your prepared baking pan. Use a spatula to spread it out evenly. For extra indulgence, sprinkle a handful of chocolate chips or almond on top.


8. Bake to Perfection.

Bake for 25 minutes, or until a toothpick inserted into the center comes out with a few moist crumbs (not wet batter).


9. Cool and Cut.

Let the brownies cool in the pan for 10 minutes before transferring them to a wire rack. Allow them to cool completely before slicing into squares—this step is crucial for clean cuts and the perfect texture!


Pro Tips for the Best Brownies Ever 🍴

  • Don’t overbake! Brownies continue to cook as they cool, so it’s better to underbake slightly than to dry them out.
  • Customize your toppings. Add nuts, caramel drizzle, or more chocolate chips for extra flavor.
  • Chill before slicing. For cleaner cuts, chill the brownies in the fridge for about 30 minutes before slicing.

Nutrition Info (Per Brownie Slice)

Serving Size: 1 slice (out of 24)
Calories: ~215 kcal

  • Fat: 12g (Saturated: 7g)
  • Cholesterol: 55mg
  • Sodium: 145mg
  • Carbohydrates: 26g (Sugars: 20g, Fiber: 1.5g)
  • Protein: 2.5g

The Best Fudge Brownies – Gooey, Rich, and Everyone’s Favorite! 🍫

Recipe by Tin-tin
Servings

4

servings
Calories

300

kcal

Ingredients

  • – 1 cup all-purpose flour

  • – 1 cup light brown sugar

  • – 1 cup white sugar

  • – 1 cup unsweetened cocoa powder

  • – 1 tsp salt

  • – ½ tsp baking powder

  • – 1 cup melted butter (cooled)

  • – 2 tbsp vegetable oil

  • – 1 tbsp vanilla extract

  • – 4 large eggs

  • – 1 cup semi-sweet chocolate chips (plus extra for topping)

Directions

  • Preheat oven to 350°F (175°C). Grease and line a 9×11-inch baking pan with parchment paper.
  • In a large bowl, whisk together flour, brown sugar, white sugar, cocoa powder, salt, and baking powder.
  • In a separate bowl, combine cooled melted butter, vegetable oil, and vanilla extract.
  • Beat in eggs one at a time until fully incorporated.
  • Gradually add the wet mixture into the dry ingredients and mix on low speed until smooth. Do not overmix.
  • Fold in chocolate chips with a spatula.
  • Transfer the batter into the prepared pan and spread evenly. Add extra chocolate chips or toppings if desired.
  • Bake for 25 minutes or until a toothpick comes out with moist crumbs.
  • Let cool in the pan for 10 minutes, then transfer to a wire rack. Cool completely before slicing.

Notes

  • These are rich, fudgy brownies—not the light cakey kind.
  • You can reduce sugar by ¼ cup (either brown or white) if you prefer it less sweet.
  • Using high-quality cocoa powder makes a big difference in flavor.
  • Let them cool completely before slicing to avoid crumbly cuts.
  • For extra gooey centers, bake for 22–23 minutes instead of 25.

Time to Dig In! 😍

And there you have it—the perfect fudge brownies that are rich, gooey, and absolutely irresistible! Whether you’re baking for a crowd or keeping them all to yourself (we won’t judge 😉), these brownies are guaranteed to impress.

If you enjoyed this recipe, don’t forget to share it with friends and family—or even better, bake a batch for them! Be sure to subscribe for more delicious recipes like this one.

Happy baking! 🍫✨