
")
A beginner friendly loaf with flavor, nostalgia, and a crust that sings when it cools.
I wanted to make something special for my mother-in-law something that reminded her of the bread she grew up with. She told me stories about the warm, chewy loaves from her childhood, baked fresh each day with no shortcuts. I didn’t grow up baking, and to be honest, sourdough kind of scared me. It sounded like a secret world full of unfamiliar steps and perfect timing.
But once I had a healthy starter, I realized the truth: sourdough doesn’t need to be fancy. You don’t need a mixer, a baking stone, or even to knead the dough. All you need is patience, a little trust in the process, and a cast iron pot.
This loaf turned out beautifully rustic with a chewy, open crumb, and a deep, golden crust. And it turns out it was easier than I thought.
What You’ll Need
Ingredients
- 100g active sourdough starter (should float in water)
- 375g lukewarm water
- 500g bread flour (or 450g bread flour + 50g whole wheat)
- 10g sea salt
Equipment
- Cast iron Dutch oven with lid
- Large mixing bowl
- Parchment paper
- Kitchen scale (optional but helpful)
- Clean towel or plastic wrap
- Sharp knife or bread lame
Let’s Bake: Step-by-Step
1. Mix the Dough
In a large bowl:
- Stir 100g starter into 375g lukewarm water until mostly dissolved
- Add 500g flour and mix until there are no dry bits. It will look rough — that’s perfect
- Cover and rest for 30 minutes (this is the autolyse stage)
2. Add Salt
Sprinkle 10g salt over the dough.
With wet hands, gently squeeze and fold the dough for 1–2 minutes. No need to knead — just work it until it becomes one smooth mass.
3. Stretch and Folds (4 Rounds)
Over the next 2 hours:
- Every 30 minutes, stretch one side of the dough and fold it over
- Rotate the bowl and repeat 4 times per round
- This replaces kneading and builds strength
4. Bulk Fermentation (2.5 to 4 Hours)
Let the dough rest, covered, at room temperature.
You’re aiming for:
- A 50–75% rise
- Smooth, slightly puffed surface
- A gentle jiggle when you nudge the bowl
Warmer kitchens rise faster. Cold ones take their time.
Shaping and Proofing
5. Pre-Shape
Turn dough onto a floured surface.
Shape gently into a loose ball using your hands or a bench scraper.
Rest uncovered for 20 minutes.
6. Final Shape
Form into a tight round or oval based on your pot.
Place seam-side up into a floured proofing basket, bowl, or towel-lined colander.
Cover loosely.
7. Final Proof
Choose one:
- Room temp: Proof for 1.5 to 2 hours
- Fridge (recommended): Cover and chill overnight (8–12 hours) for a better crust and flavor
Time to Bake
8. Preheat Your Oven
Place your cast iron pot with lid inside.
Preheat to 475°F (245°C) for at least 30 minutes.
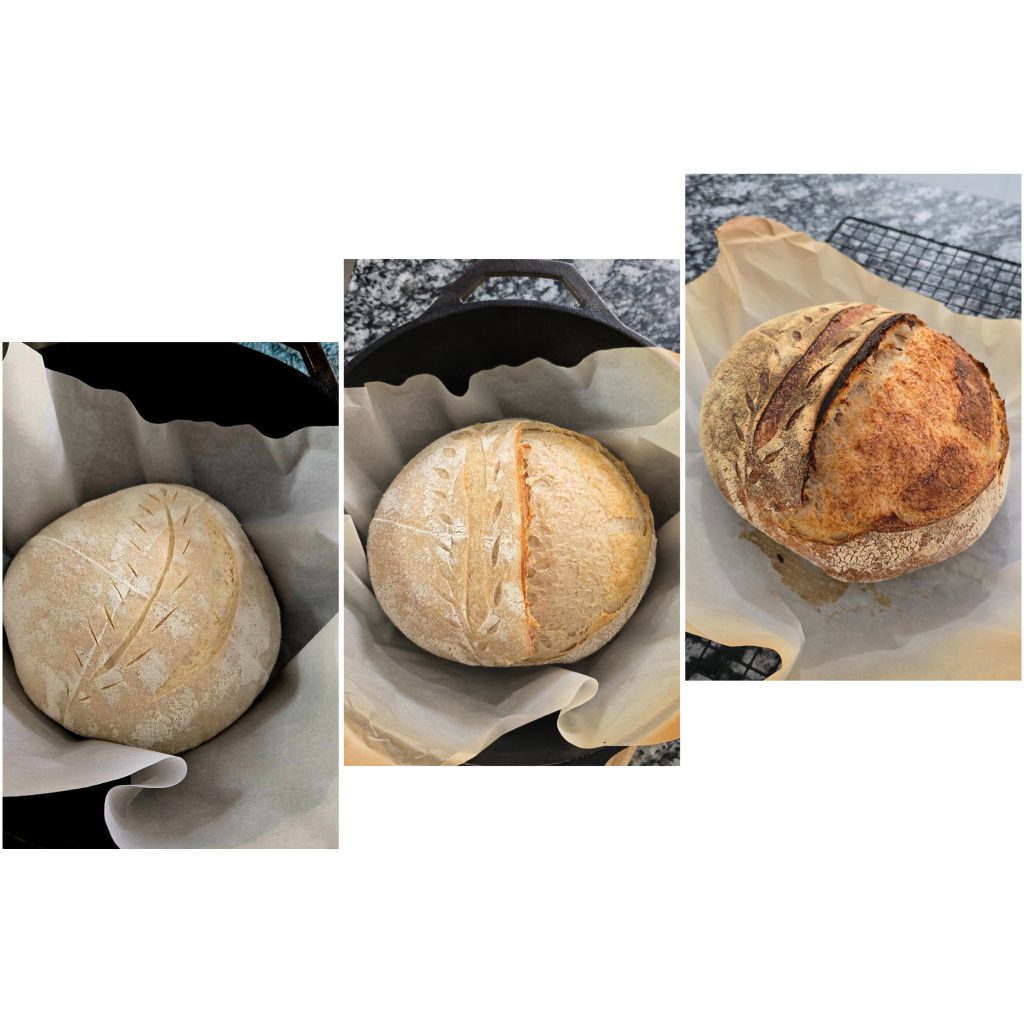
9. Score and Bake
- Flip dough onto parchment
- Score the top with a sharp blade (a deep slash down the middle works well)
- Remove hot pot, carefully lower in the dough using parchment as a sling
Bake:
- 20 minutes covered
- 20–35 minutes uncovered, or until crust is deep golden brown
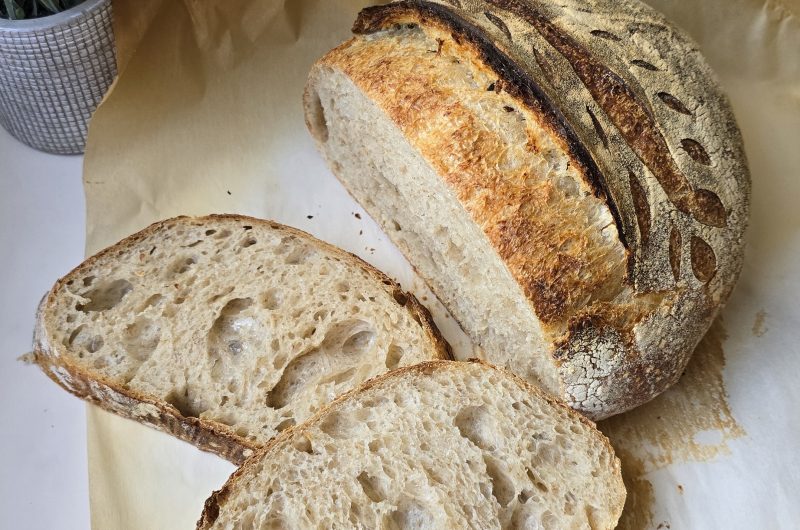
10. Cool (This Part Is Hard)
Let your bread cool on a wire rack for at least 1 hour.
It’s tempting to slice early, but the crumb needs time to set. Trust me, it’s worth it.
Tips That Helped Me
These tips saved me from a lot of stress and weird-looking loaves. Hope they help you too:
- Sticky dough? Wet your hands. Don’t add extra flour unless absolutely necessary. Stickiness is normal and gets easier to handle as you fold.
- Use a clear jar with a rubber band to track how much your starter rises. A floating starter is a ready starter.
- If your dough isn’t rising much, check the room temp. Ideal sourdough temps are between 70°F and 78°F. Cooler rooms can slow fermentation a lot.
- Want extra crust crunch? Remove the Dutch oven lid during the last 5 minutes and crack open the oven door slightly.
- Don’t skip the full hour of cooling. Cutting into hot bread makes the inside gummy and ruins all your work.
- No proofing basket? Use a colander or bowl lined with a floured towel. Rice flour works great to prevent sticking.
- Parchment makes transfers easy. Slide your dough in and out of the pot without drama or dough disasters.
- Forgot a stretch and fold? No big deal. Just do the next one and carry on. It’s not that serious — the dough is forgiving.
- Flour your hands and surface lightly during shaping. Use just enough to keep it manageable without over-drying the dough.
- Scoring matters. A clean, confident slash helps the bread expand in the oven. Dull knives will just drag the dough.
- Freeze your leftovers sliced. That way, you can toast one slice at a time and it still tastes like fresh-baked.
- To refresh day-old crust, splash the loaf with water and reheat it at 400°F for 5–10 minutes.
- Not sure if it’s under or overproofed? Take notes. It’s part of learning. You’ll be amazed how quickly your instincts sharpen.
Sourdough Bread in a Cast Iron Pot (No Kneading Needed)
12
servings140
kcalA reliable, beginner-friendly sourdough recipe that balances flexibility with structure. No complicated tools, just a cast iron pot, a healthy starter, and some patience.
Ingredients
100g active sourdough starter (should float in water)
375g lukewarm water
500g bread flour (or 450g bread flour + 50g whole wheat)
10g sea salt
Directions
- Stir the starter into the water until mostly dissolved.
- Add flour and mix until there are no dry spots.
- Cover and let rest 30 minutes (autolyse).
- Sprinkle salt on top.
- With wet hands, gently fold and squeeze the dough until it comes together.
- Every 30 minutes over 2 hours, perform 4 gentle stretch-and-folds.
- This replaces kneading and builds dough strength.
- Let dough rest, covered, for 2.5 to 4 hours at room temp.
- Look for a 50–75% rise and a jiggly, slightly puffed surface.
- Turn dough onto a floured surface.
- Gently shape into a loose ball. Let rest 20 minutes.
- Shape into a tight ball or oval depending on your baking vessel.
- Place seam-side up in a floured proofing basket or bowl. Cover loosely.
- Room temp: 1.5 to 2 hours OR refrigerate overnight (8–12 hours) for better crust and flavor
- Preheat oven and covered Dutch oven to 475°F (245°C) for 30 minutes.
- Flip dough onto parchment, score with a blade, and bake:
- 20 minutes covered
- 20–35 minutes uncovered, until deep golden brown
- Let cool on a wire rack for at least 1 hour before slicing. Don’t skip this.
Notes
- Sticky dough is normal. Use wet hands instead of more flour.
- Overnight proofing gives deeper flavor and a crunchier crust.
- Use parchment paper to make transferring dough into the pot easier
- Don’t skip the full cooling time — slicing too early makes it gummy
- Leftovers? Slice and freeze. Reheat in the toaster and it still tastes fresh.
Final Thoughts
This bread isn’t just food it’s a little piece of memory. For my mother-in-law, it brought back childhood comfort. For me, it was proof that I could make something from scratch that felt like home.
If you’ve been nervous to try sourdough, trust me once your starter is ready, the rest is way simpler than it looks. You don’t need to knead. You don’t need to be perfect. Just mix, fold, wait, and bake.
And when that crust crackles fresh out of the pot? You’ll be hooked.